Recalbox for dummies: A simple and accessible guide
Wed May 28 2025
Recalbox for dummies: A simple and accessible guide
You've tried Recalbox at a friend's house, you're following our news on social media, your thirst for retrogaming is growing, V10 is coming, the RGB DUAL 2 is catching your eye... but you're still hesitating to jump in, afraid it might be too complicated. Don’t worry: Recalbox is made to be accessible for everyone.
Before we explain how to get started with Recalbox, keep this in mind: Recalbox was specifically designed to be plug and play, so anyone can install the system and relive their childhood games without complex steps.
Of course, the project also allows users to go further by customizing the experience and adapting it to their specific needs. But in this guide, we’ll show you the simplest and most universal way to use Recalbox.
All the steps explained here are also available in the video at the bottom of the article: Recalbox Tutorial 2024: The Ultimate Beginner’s Guide.
Recommended Hardware
If you want to build your own retrogaming console, we recommend installing Recalbox on a Raspberry Pi 5 (4Gb). Why?
- Because it’s affordable
- Because everyone has the same Pi 5, avoiding the need to manage dozens of different setups
- Because it’s reliable hardware
- Because it will be dedicated solely to Recalbox, avoiding conflicts with other programs
What You’ll Need
- Raspberry Pi 5 Kit (includes the Pi 5, power supply, and HDMI cable) (4Gb model)
- MicroSD card (32GB is enough, and one is usually included in the kit)
- MicroSD card reader (if your PC doesn't have one)
- USB stick — 128 to 256GB recommended (at least 500GB if you have full sets or many CD games)
- 8BitDo Pro 2 Controller — Wired or Bluetooth. For Bluetooth, you’ll need a dongle per controller.
- Existing PS3, PS4, or Xbox One controllers are compatible with Recalbox.
Watch Out for Quality
For the MicroSD, USB stick, and controllers, go with recognized brands.
In retrogaming (as in many areas), buying cheaper often means buying twice. Many common problems are caused by low-quality peripherals.
- Controllers: Use official PlayStation or Xbox controllers, or reliable and stylish 8BitDo models
- Storage: Stick to SanDisk or Kingston; avoid generic brands
Setup and Installation
You’ve received your package and you're ready to go. Take your time and work in a quiet space.
Never handle your Pi 5 with the MicroSD or USB stick inserted—that’s the fastest way to damage them.
Place the Pi 5 in its case with the fan — don’t force anything.
Insert the MicroSD card into your PC (or adapter), ignoring any messages from Windows.
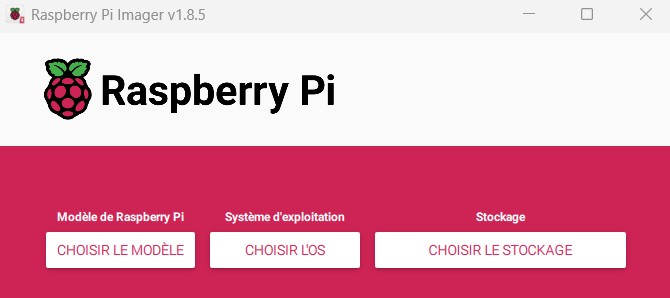
Go to the Recalbox download section and install Raspberry Pi Imager. Launch it:
- In "Choose Device", select Raspberry Pi 5
- In "Choose OS", go to Emulation and Game OS > Recalbox > Recalbox Pi 5
- In "Choose Storage", pick your MicroSD
- Click “Next”
The software will now flash Recalbox onto your MicroSD card. This process takes a few minutes. Once complete, unplug the MicroSD, insert it into your (powered off) Pi 5, connect to your TV, and power it on. Recalbox will finalize setup in seconds and show the home screen.
Controller Setup
Plug in your controller (or Bluetooth dongle if wireless) and pair using the designated buttons. Once detected, press:
START > Controller Settings > Configure a Controller
Follow the on-screen instructions to map all buttons. You’ll already be able to navigate menus to switch Recalbox to English (or your preferred language).
Note: The “Hotkey” button on 8BitDo controllers is the one with the pixel heart.
❗ You must do this for every new controller. It resolves most controller-related issues.
Games & BIOS Files
Recalbox does not include any copyrighted content: no games, no BIOS files.
You will see some games included — these are homebrews (community-authorized creations).
Don’t expect Super Mario Kart or Final Fantasy right away — you’ll need to add your own.
- Format your USB stick on your PC:
Right-click > Format > exFAT - Plug it into your Raspberry Pi (powered on). Recalbox will offer to initialize it — accept.
- Unplug the stick from the Pi and plug it into your PC. You’ll see a folder:
Recalbox > roms >with subfolders for each console. Add your games (PS1 inpsx, Saturn insaturn, etc.)
Each folder has a “readme” file: read it! It tells you which formats are supported.
Adding BIOS Files
BIOS files must be added directly to the MicroSD card (not USB). You can access it:
- Via network (if your Recalbox is connected, it will appear on your PC)
- Or by powering off your Pi and plugging the MicroSD into your PC
Place the BIOS files into share > bios.
You can verify them in a dedicated Recalbox menu.
Scraping Your Games
At first, you won’t see covers, descriptions, or videos. You need to scrape them.
Go to the main menu > “Scraper”. There are several ways to enhance your library.
Follow Fabrice’s video for the best settings:
❗ Scraping can be long: you're downloading hundreds of images/videos.
If you support Recalbox via Patreon, you'll get access to faster servers — up to 40x faster.
Save & Exit Games
Useful shortcuts:
- Exit game:
Hotkey + Start - Save game:
Hotkey + Square - Load save:
Hotkey + Triangle
You’re Ready to Begin the Recalbox Adventure!
You’ll gradually discover more menus and settings to personalize your experience.
Take time to explore and experiment — you’ll quickly get comfortable.
Keep Recalbox connected to the internet to ensure updates (bug fixes, stability improvements), and for support on Discord, you’ll need to be on the latest version.
We encourage you to join our Discord community — over 13,000 members ready to help, share passion for retrogaming, join challenges, discover new games… and just have fun.
You'll also find a YouTube playlist with over 100 video tutorials covering different setups and use cases (Arcade, JAMMA, NAS, etc.).
Finally, Fabrice hosts a live Q&A every Saturday and Sunday at 10:00 AM on our Twitch channel — ask questions in the chat or join the live call if possible.